At one camp, part of staff training involved teamwork activities, one of which included a high ropes course that was a part of the offerings at camp. For those not sure what a high ropes course is, it is like an obstacle course build up high in tress or poles. Ours was located up in a bunch of trees that were reached by a high ladder and ended with a zip line across a field. Every person who went up on the course was required to wear a harness for safety and support that high up. (Part of our naturalist staff was trained and certified in this.)
The first year, I made it up the ladder to the platform, but my fear of heights was so severe that I didn't make it any further and ended up coming down. I helped catch people when they came off the zip line.
The second year, I got a little braver. Despite my nearly debilitating fear of heights I got up the ladder, hooked up to the harness, and through the course... somehow. My high ropes course partner was just about as afraid of heights as I was and we spent a large amount of the course with me wrapped around a tree and my partner wrapped around me and the tree. We made it through, taking the shortest route we could and even made it across the field on the zip line. Facing our fears is not always an easy thing to do, but it can be done and there can be great rewards as a result.
Thursday, June 30, 2011
Tuesday, June 21, 2011
Camp Tales - A Clown in Camp
It's not easy been a clown... but it an be a lot of fun.
My first summer at camp my roommates learned that I did a little clowning on the side, not the typical side hobby, but since do I go for typical. One of my roommates had her own county coming into camp and asked me if I would be willing to clown for her county for their carnival night. I agreed and we let their staff know, making the necessary arrangements.
My roommates had never seen me in clown costume and make up, let alone watch me get ready The guys were watching TV when I started getting ready but putting on my top and tights then laid out the colorful make up. I started with my layer of white make up, covering up my skin thoroughly then sat for a few moments in front of the fan, letting it dry completely. The guys soon seemed more fascinated with watching me put on clown make up than whatever they were watching on TV (probably a movie they had already seen, since we had no cable and only got about 1 1/2 channels depending on the day and the wind being just right). Before long they had watched me transform from me to a face painted, costume wearing, wig wearing clown. Then I headed down to the recreation hall for the carnival.
I am a silent clown, often prone to bouts of shyness in response to shy kids. (It also helps keep my identity from kids who might know from the Craft Hall.) I spend the time making balloon animals for kids and having visiting adult staff trying to catch me up and get me to talk (which I did not let them succeed).
After the carnival, the kids headed to the next event on their evening agenda while the staff got to play on the bouncy thing without them.... even the clown. (And there she did talk.... or scream as she played with the rest jumping, pushing, and being pushed.)
Monday, June 20, 2011
Ceramics Flashback
This jewelry box was from my eighth grade art class. (I re-found it recently packed away in a box.) Once upon a time it had a square lid with a handle that fit it approximately. The lid seems to be a casualty of time, but the box itself is in one piece. It still is engraved with my last name and class period on the bottom (from before it went in to kiln) as well as my full name, year, and what appears to be y teacher's grade penciled on the bottom of it. (Pretty sure it was an A.)
It may not have been perfect but for a kid it was my way from the shape to the heart on one side to the rough rainbow on the other and the green and brown glaze.
I have a lot of great memories from that lass... it seems some that even have something to do with art. It was the last art class I took in school choosing to spent my high school arts in music.


Sunday, June 19, 2011
SNake Bracelet
This was a gift a friend made. She makes all sort of jewelry designs from wire. (The snake was one of my favorites, without question.)


Saturday, June 18, 2011
Camp Tales - Underground Railroad
Many camps offer a variety of activities that not only get the kids outside and having some sort of adventure, but also teach. At the camp I spent the most time working, we offered an Underground Railroad program. It was a combination project that gave the kids a background in the Underground Railroad, then divided them up into groups, and sent them through the woods to go through a number of "Railroad Stops", while not being caught or shot (water gun) by slave chasers (often their counselors). Each stop had different things they had to successfully maneuver, while getting their entire "family" group safe into the North. It was a combination of adventure mixed with history. One summer one of the staff decided he wanted to bring an new element to the project and offered to dress like a runaway slave and give an mini scene as part of the presentation. He came to me about creating a costume for him.
Using an old white shirt from the paint shirts in the Craft Hall I went to work dying it in multiple couples from my tie dye buckets to give it a dingy appearance, let it dry. I even rolled it in the dirt, stomping on it as I went. (Receiving a few interesting looks from passing campers and staff that didn't know what I was working on) I placed it on his body then armed with a pair of scissors I went to work shredding the sleeves and edges, then made slips across his back like whip marks.
Using what I had on hand, which happened to be make up, I bloodied up the edges of the whip marks with red lipstick mixed with mascara and blush.

We completed the costume with an old pair of jeans he had, a beat up pair of unlaced boots, a chain we borrowed from something on camp, and a walking stick he found on camp. Using more of my make up, I made marks on his skin underneath the slits on his shirt with my light colored concealer (it looked great on his dark skin for this effect), red lipstick, black mascara and eye liner, with a mixture of eye shadow and blush.
He prepared his own scene to introduce himself as a runaway a slave before the kids were sent off on the journey and was waiting for the in the "North" when they got there. The reaction of the kids to his character and the whip marks we created was amazing to us both. A couple of the kids forget we were playing and were afraid that touching his painted arks would cause him pain. It had a definite impact on a number of us and brought a new depth to the project that any of them had participated multiple summers.
Friday, June 17, 2011
"Golden" Bracelet
 Props and costumes in theater often have to be done on the cheap, and when I say cheap I mean really, REALLY cheap. And often that cheap means for as little as possible. For a production of "The King and I" there were a number of actors portraying wives and royal children all needing to be well dressed this included gold bands for both children and adults The costume designer (which I helped) was able to create a number of gold bands by cutting thick cardboard tubes from rugs into bands Each band was then deorated with glue to give a textural design then sprayed with gold spray paint and let dry. Viola!
Thursday, June 16, 2011
Fiery Top Hat
Sometimes we all need a little fire in our life. This hat was a plastic top hat that I painted with a combination of red, yellow, and orange paint to give a fire appearance. I'm sure I'll fine the perfect costume for it. (I always do.)

Wednesday, June 15, 2011
June Camp Poll
Don't forget to vote in the June Poll (located as always on the right hand side of the blog). This month we ask about your summer camp experiences whether you were a camper staff or counselor or both.
Crash Box - Make Some Noise

 Collect discarded or broken dishes and/or knick knack type things. (I had a couple broken dishes and a few broken Christmas ornaments to use.) Whatever it is make sure it IS NOT something that is good beause it will get broken and beat up. I added the broken dishes and ornaments with a couple empty and cleans cans from my recycling bin.
Place the broken dishes and whatever else you have to make noise inside a sturdy cardboard box. (Easy, right?) You want enough to make noise inside, more or less can be used depending on what you are doing.
 Secure the ends of the box and sides with a sturdy tape like duct tape. Don't be stingy as you don;t want little shards of glass to escape. Secure and wrap to make sure all the seams and openings are taped well. (Then tape again to make sure.)
 Once everything is secured drop. (I always writer "Crash Box" on the side to make it clear what it is) Eventually after enough dropping and crashing the bits will get so broken up that it will be tie to discard and start all over as needed Usually you can get at least a show run or so out of the without any problems.
Make some noise.
Tuesday, June 14, 2011
Jewelry Bowls
 We are surrounded by things that can be given new life and made into something else. I made these jewelry themed bowls, the perfect size and theme to hold rings, other jewelry or change on your dressing table or dresser (I love little things like this).
One of the best parts - everything was from stuff I already had around the house. (And it's even recycled! How can you not love?)
 This is a rather easy project that uses paper mache' techniques to create, with drying time taking up the most of the time. Just a little patience is all it takes.
Supplies
* a glass bowl or other container, any size (to use as a mold) - (for this project I used small glass bowls from our cupboard that are were about four inches across and often used for dips or fruit in out house)
 * plastic wrap (to cover the mold)
* white glue or Mod Podge (something that will dry clear and secure everything together smoothly)
* old paint brush (for use with glue) - paint brushes are awesome to use with paint or decoupage
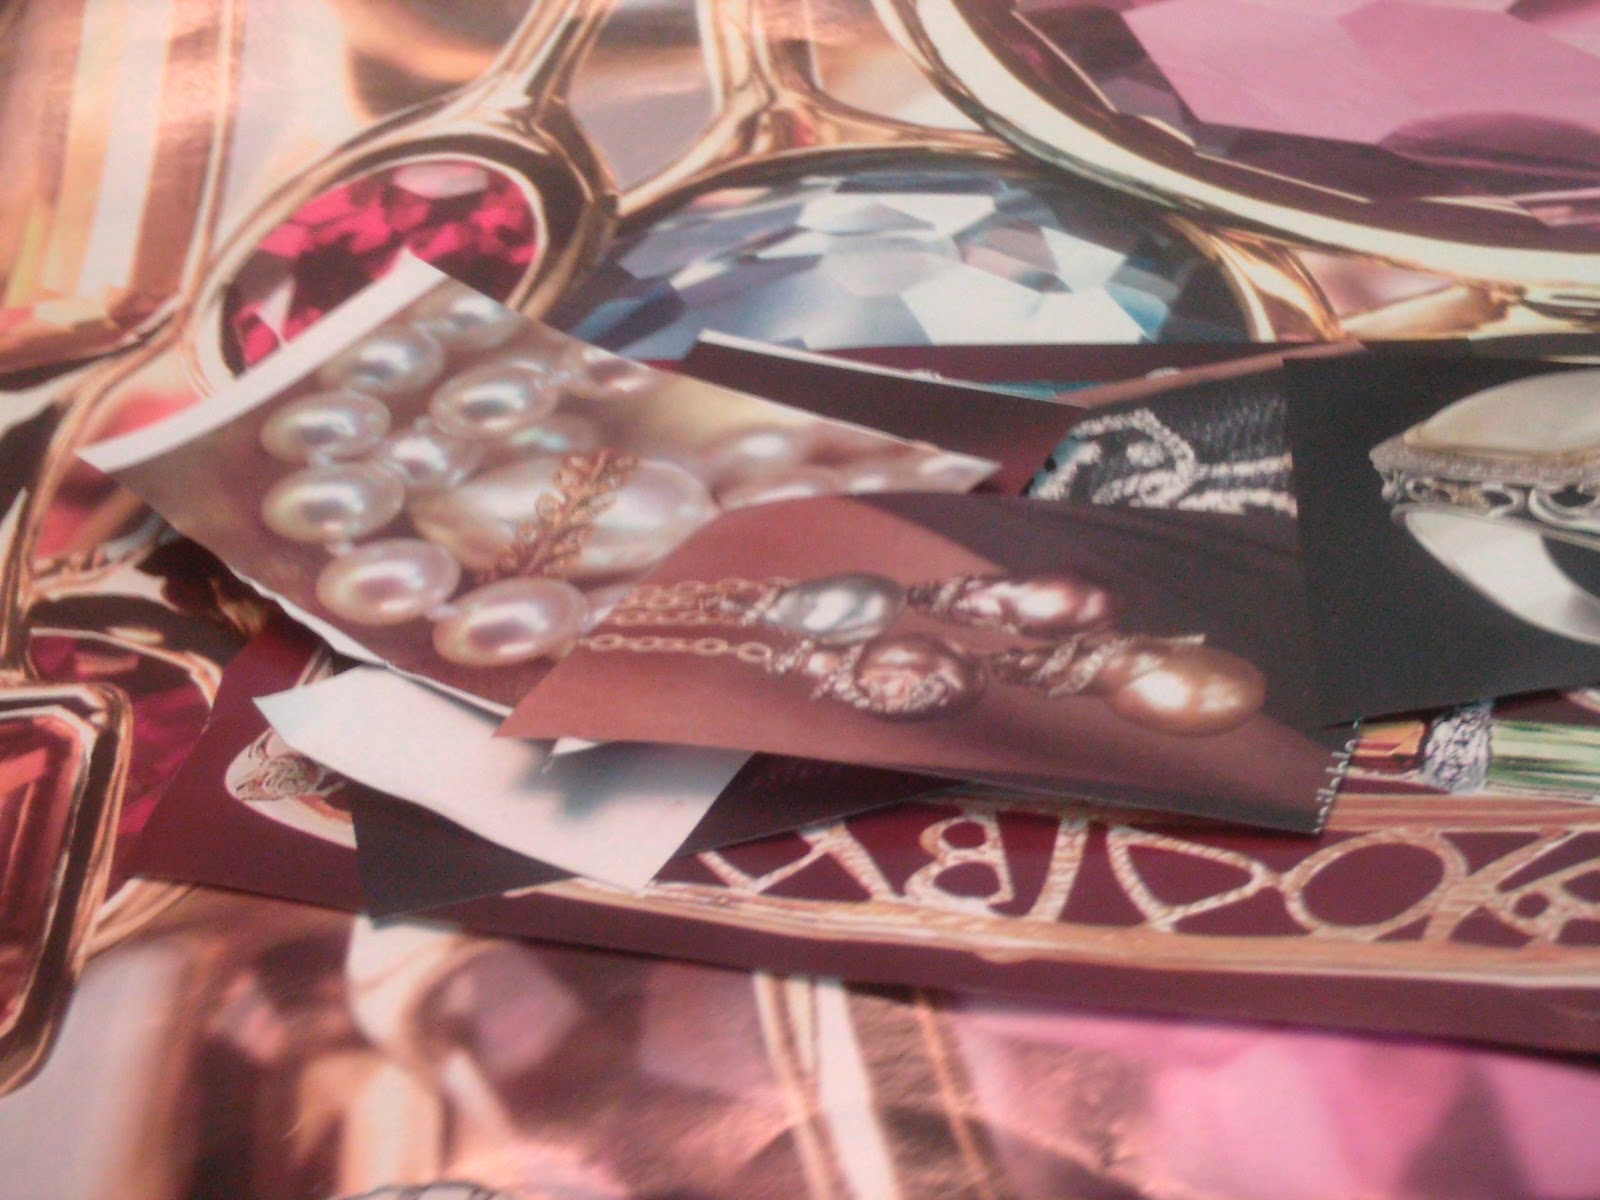
* desired paper such as magazine pictures or newsprint (I used magazine pictures of jewelry and gem stones from magazine ads)
 * scissors or craft knife (as needed)
 * OPTIONAL: desired embellishments (such as glitter, pearl wire, beads, ribbon, or whatever inspires you) and something to attach (such as the white glue from before or a hot glue gun)
(1) Start with laying plastic wrap across the bowl that you are using as a mold. This will keep the finished project and glue from sticking to the bowl. (You can use other types of plastic, but I preferred the clear plastic wrap so that I could see through as I worked.)

 (2) Start layering the paper with glue inside the mold, using the paint brush to spread the white glue or Mod Podge evenly across the pages. Using the glass and clear to position the images on the outside of the creation. Build this up to desired thickness placing multiple layers of paper and glue. I positioned the inside with images like the outside to create a design. Using the paint brush with glue make sure there is a nice smooth layer of glue or Mod Podge to secure the outside edges and give a smooth outer layer. (You don't have to worry about the edges being uneven that an be taken care of later after everything is dry.)
(3) Let dry.
(4) Once the bowls are more set up you can remove from the mold and gently peel off the plastic wrap. Let dry completely.
 (5) Apply more layers of white glue or Mod Podge as needed to seal securely. Spread glue on the outside to secure and seal outside edge.
DO NOT BE AFRAID TO LIBERALLY USE YOUR WHITE GLUE OR MOD PODGE TO REALLY SECURE AND SEAL EVERYTHING INTO ON PIECE.
(6) Trim edges with craft knife or scissors for a lean edge.
Let dry completely.
 (7) One everything is COMPLETELY DRY embellish edge as desired. In this case I used a white glue around the edge then dipped in colored glitter for a couple then pearl wire attached with a hot glue gun. (You could leave plain or embellish with whatever you have on hand such as ribbon beads old jewelry pieces or whatever else.)
 Great for gifts or to catch your bits and pieces around the house. The options are endless - you an use any size bowl, attach a few together, add legs or another base. Experiment. Decorate. Share. Enjoy. And never forget to let your imagination run wild!
Monday, June 13, 2011


Sunday, June 12, 2011
Camp Tales - Staff Quarters

Living at camp whether in a cabin or in staff quarters can be an intersting eperience. I never lived in a cabin as a counselor, instead I lived staff quarters or in a cabin with my dog. The upside of living in staff quarters is a certain freedom that can not exist in the rest of camp. Of course, putting five girls in one room is an experiment in social constructs. Even when living at camp where most live in jeans, shorts, t-shirts, or bathing suits there is a question of closet and drawer space.
Between the girls and the guys room next door we learned to share. We did get sick of each other at times, but we learned to deal with each other. We shared our bedrooms, a living room with a kitchenette on one end, bathrooms, and a washer and driver. Inside the staff quarters we cooked together, watched movies (we only had one or two channels on a good day), played games, and terrorized each other.
Mostly the quarters were pretty decent. Bugs and insects found a way in and there were a couple larger critters that found their way in, including a raccoon and a snake.
Saturday, June 11, 2011
A Tisket... A Tasket... A Basket..

Friday, June 10, 2011
Creativity = Rebellion
Rebellion means a lot of different things to a lot of different people. The merriam-mebster.com online dictionary defines rebellion as
1: opposition to one in authority or dominance
2 a : open, armed, and usually unsuccessful defiance of or resistance to an established government
b : an instance of such defiance or resistance
I find a sense of truth in the art of peaceful rebellion. True rebellion does not seem fed from destruction but from the creation of something whether something tangible or a concept. We create and therefore we take a stand against or for something, even in the smallest forms. We rebel against a world that might otherwise take away our individuality or our sense of self. We create and something new emerges, even in the creation of a new version of something else We create because we chose to grow and because we chose not to destroy. We create because it fills us with pieces of ourselves and our abilities.
In honor of this mind set check out this article about entitled A Rebellion of Substance and Style: The Arts and Crafts Trail.
Thursday, June 9, 2011
A Bunny Costume From Long Ago

A certain bunny costume was made for me when I was maybe 2 or 3, one of my earliest memories with the floppy ears and bunny tail. I remember a plastic bunny nose at least one year This costume ended up getting a lot of use, but not just for me as it was passed down through my younger siblings as one kid grew out of it and another fit into it. A lot of costumes worked that way and for years we went to the costume collection (all hand made of course) to figure out what would fit who.
Wednesday, June 8, 2011
Camp Tales - Fashion
Living at camp and need something nice to wear to dinner? Why not make something out of what you have on hand... like black and white garbage bags.
One warm afternoon, while our quarters were being bug bombed, we were trying to come up with something to wear to a "nice" dinner. Lucky for us, I had a stash of plastic garbage bags in the Craft Hall. We fashioned dresses fro large black trash bags accenting them with strips of white garbage bags for bows, belts, and even hair ties. Once we were all 'gussied' up we needed needed dates to escort us with we made from balloons with drawn on faces. They were a huge hit with the campers, counselors, and other staff. You use what you have, and we had garbage bags.

Tuesday, June 7, 2011
Bottle Cap Locket Instructions - "Peace is Golden"
 I love love love trying new things. Jewelry is pretty high on that list. This love brought me to the Bottle Cap Locket. (In my house, getting my hands on bottle caps doesn't seem to be a problem.) I already have some ideas for variations of this.
Supplies (I used):
2 clean bottle caps
Gold thread (for the "chain")
Small bit of gold ribbon, 1 1/2 - 2 inches
 Pearl wire
Paper
Craft Glue
Tools (I used):
Pliers (Oh, look! My pink handled needle nose pliers)
Needle and thread
Hot Glue Gun
 Scissors
1) Using pliers (found this works better than a hammer, which does often leave the in weird shapes), bend down the sides of the bottle cap to leave a nice edge. For one locket, you will need two bottle caps.
 2) Paint outsides of bottle caps to preferance. I used gold spray paint (it sure has been getting a lot of use!). Just for cleanliness factor I usually spray paint things inside of a box. This keeps the over spray and the colored mist from getting on this I would rather it not. Let dry.
 3) While the bottle caps were drying I cut my "chain" from the gold thread, taking three pieces of thread cut to the same length and laying them against each other. I placed a knot in the center of the three, connecting them to each other. I then placed two more knots midway between the middle knot and the end for a total of three knots. I wanted the more loose feeling for this, but I could have braided or used macrame knots here instead if I had so desire.
4) Once the bottle caps were dry I carefully attached one end of the golden ribbon inside one of the bottle caps with hot glue (you could use a craft glue instead). Then attached the other end on the inside of the bottle cap with glue as well, leave a small piece in between, maybe 1/2 inch in length. Make sure these are secure and dry/cool before moving on.
 5) Fold the bottle caps on the ribbon in half, so that the bottle cap bottoms meet and line up evenly. Taking the needle and thread hand sew across the top of the bottle cap, making the ribbon piece into a loop to hold onto the 'chain'. Knot and tie off when secure. It will look a bit like a clam here.
 6) Using pearl wire I hot glued a ring around the edges of the locket and trimmed a few apart to make a design in the center as well. (You can use any kind of embellishment or use a white craft glue instead, but I like hot glue and the immediate bond with short drying time.) You know have what looks like a locket.
 7) For this locket, I chose to include pictures on the inside and opted instead for one side to include a peace sign made from the gold thread a piece of paper cut to size with a clear drying white craft glue to secure. For the other side, I have the message "Peace is Golden" secured with and under a good layer of the clear drying white craft glue.
 I found my original inspiration for this project at www.cutoutandkeep.net. Make one for yourself or one as a gift.


Monday, June 6, 2011
Colonel Crawford En-Campment
 Over the weekend I attended a re-enactment and encampment of Colonel Crawford's capture. (For those who do not know much about Ohio history his capture and torture was the response for another man's brutal massacre of approx. 100 Christian Moravian men, women and children. Because of their deeply rooted religious beliefs they did not fight back against their captors and instead prayed and sang until their time to meet their death by hammer.) Many believe that Crawford was in the wrong place at the wrong time and suffered horribly as an example to others. (Find more about Crawford here.)
 The re-enactment was good and the costumes had so much thoughtful detail. As a part of it there was an encampment, various displays and artisans, and demonstrations.I pleased to find all sorts of artisan showing off their wares or demonstrating skills. This included various handmade jewelry (beaded and metal work), carved wooden flutes in the style of the Plains Indians, a type of hand weaving for belts and scarves that I had not seen before, pottery in process, a man working on braided rugs (from a local historic society), hand dipping tallow candles (I can not imagine lighting might house with animal fats, but it happened), an assortment of weapon reproductions, as well cooking. It was so nice to not only see examples of some of these nearly forgotten crafts that were one a part of everyday life but to also see that the skills to do them were being presented.
It turned out to be a lovely afternoon.
 For more information about the massacre and the history check out these links:
http://www.graveaddiction.com/gnadenhu.html
http://gnadenhutten.tripod.com/
http://en.wikipedia.org/wiki/Gnadenhutten,_Ohio
http://www.history.com/this-day-in-history/colonel-william-crawford-proceeds-toward-the-ohio
http://www.touring-ohio.com/history/crawford.html
Sunday, June 5, 2011
Medievel Dress

While still in my 4-H days I made this burgundy and ivory medieval dress as a sewing project one year. It's all one piece with a zipper down the back, made of an under skirt and under skirt, puffing sleeves, and fitted bodice. The burgundy over skirt is made from four panels, each panel big enough to wrap around my waist. The bodice was fitted to my body, but fits a little differently than it did ten years ago.
Over ten years later and it still gets a lot of use, I wore it for a camp skit one summer (with a piece of lace underneath as a kind of modesty piece), and have worn it more than once at for the Ren Faire, and a couple Halloweens.

Saturday, June 4, 2011
Decoupaged Elvis Picture Frame

 Doing a project a project like this an be done with a thinned out white glue (the kind that dries clear) or a Mod Podge and an old paint brush. I have both on hand.
1) I started with one picture frame. (This holds a 3 1/2 5 inch picture.) I have a small stash of the that I picked up in a craft section. They have different shaped openings but for this project I liked the star. I then removed the plastic photo cover from the inside. (This keeps the paint off of it.)

2) I then gently seperated the front from the back. This is totally optional. They were glued together to start, but I figured it would be easier for what I was doing.
3) I collected my Elvis images cut from a magazine and laid them out to work.
 4) I then went to work on decoupaging my images in a collage on the front of the picture frame, layering it securely between layers of thinned glue and Mod Podge. (My Mod Podge is running low so I stretched it with some thin white glue, but I made sure the top layers were all Mod Podge.) You want to make sure the keep everything nice and smooth, the edges sealed nicely under the glue or Mod Podge (or whatever else you have on hand.) Don;t be afraid to use enough layers that it is nice and thick and white. It will dry clear and you want to sealed in.
5) Let dry completely.
6) I then re-glued the front to the back, making sure to leave the opening at the top to insert the picture. (I have a few ideas for what might go inside it.)
Yes, I am an unapologetic Elvis-loving freak and I love every minute of it. And I really do not care that some people might not find it "cool" or whatever else. I say, embrace who you are and love what you love. Life is more fun that way.


Subscribe to:
Posts (Atom)