Tuesday, May 31, 2011
Do you Power Tool?
Today is the last chance to vote on May's Poll about your use of Power Tools. (Located on the right hand side of the blog.) Tomorrow we start a new one!
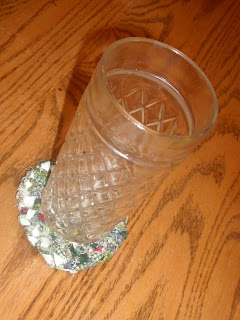
MIni Braided Rug
Need a a mini braided rag rug? Maybe one for your glass? Or a dollhouse? This little rug is a great size for use as a coaster or to fit inside a dollhouse.
Inspired by the larger braided rugs: For a mini rug use thin cut strips, made the same way as a larger one, just stopping a lot sooner to sew off the end.
Inspired by the larger braided rugs: For a mini rug use thin cut strips, made the same way as a larger one, just stopping a lot sooner to sew off the end.

Monday, May 30, 2011
Camp Tales - For the Love of the Spiders
Most of my rules and daily life at camp involved creativity, creation, and the safety of those who spent time in my Craft Hall. I encouraged my campers to create and assured them in their creativity was one of their greatest gifts. But there was another lesson I was trying to constantly instill in my young charges - to constantly respect the natural world around us and the creatures that made this place their home during the months we were there and the months we were not. Protecting the spiders and the webs in the corners of my raft Hall was nearly a constant battle. Somehow any of these kids saw the spider webs in the high corners of the pavilion that sered as a Craft Hall as a threat that needed someone clean out. Perhaps it was the hippy in me, but the one rule that I had to constantly remind both campers and counselors was to respect my spiders. I reminded them that during the months that we were not there, the critters were the only ones who called this places home. I reminded them that the critters called this place home year round and not a week at a time, like they did. I reminded them that the spiders had an important job to catch other bugs and mosquito's, the very ones they often complained about biting them. I reminded them constantly, that the spiders were my friends and did not like my friends being injured or their work undone. Somehow, my spiders were generally left alone and I hope that a few kids gained a new light about the world around them.
For the love of my spiders... leave them in peace.
For the love of my spiders... leave them in peace.
Sunday, May 29, 2011
Hot Glue Gun
A hot glue is a wonderful thing, a wonderful tool. You can find the one that fits you. For most projects I am a HUGE fan of my mini low temp hot glue. At camp I had a basket full of them. (I kept the high temp ones for counselors and staff only, since I have been known to burn myself enough on them.)
I was helping a few friends with costumes awhile back and got to introduce one of them to the hot glue gun, something she had never used before. I was convinced I would come back the next day to find that she had hot glued sea shells and things to every surface of her home. It wasn't that severe, but she did find how much easier it was to attach things to the shoes and make accessories for her costumes. I think she even got one as a Christmas present.
Hot glue guns are one of those little things that should be a part of every crafter's supplies, every stage box (for you theater bugs out there), and just handy to have around the house (you never know when one might come in handy).

Saturday, May 28, 2011
Embellished Compact
 I love all sorts of forms of creativity and arts, including theater. I have been active in theater, on and off stage, for years. For a recent show, I needed a personal prop that was fitting for my character. One option was a plastic compact that was difficult to use with my gloves and not very cute. So, what's a theater bug to do? Embellish a plain one herself, of course.
 The glue didn't have quite the lay I wanted, but it shouldn't read from stage and I might try another to give a different appearance.
 I started with an old, empty compact that would otherwise have been thrown out. I washed the remnants of face powder from the compact and let it thoroughly.
 Using my beloved low temp hot glue, I made a raised design on the top of the compact and let cool completely. (Don't worry about the colors, just the raised design.)
With a can of gold metallic spray paint I thoroughly painted both the top and bottom outside of the compact, using more than one coat. Make sure to get the edges, hinges, and clasp. You don't want the under color to show through when it's closed. Let paint dry COMPLETELY.
 I decorated the inside for my own benefit, because it won't show onstage. For the inside I decorated a circle of paper with the characters initials and colors being used in the costume. I attached this to a cut out piece of cardboard, cut the same size to fit in the powder place. Secure inside with hot glue (or any other glue). I used the piece of cardboard and hot glue for the inside instead of just decoupaging straight to the metal because I wanted a flat appearance instead of the lines int he metal.
  Using what I hand, I sealed the paper inside with a clear top coat nail polish I already had. It sealed the paper/cardboard base and gave a clear finished looked to it.
It's ready to go.


Friday, May 27, 2011
Camp Tales - Flooded

 In honor of the recent heavy rains...
 At the first camp I spent my summers in the Craft Hall, the camp was divided into two sides and connected by a driving a bridge and an iconic walking bridge. The boys cabins were located on one side, with the pool, a Recreation Building, and a scattering of other buildings. This was usually refered to as the "Boys' Side," for obvious reasons. The other side, included the multi-purpose building (that housed the staff), the camp offices, the dining hall, the Craft Hall, and of course, the girls cabins. (This calling it the "Girls' Side.) Each side had bathrooms and showers and a road to get in and out (although the one side was less used and needed a vehicle capable of rougher terrain.) The bridges were very important to movement back and forth connecting camp, as well as for non-resident staff to get to the staff parking and for delivery trucks to the dining hall.

 Boards were placed in the car bridge regularly to dam it for canoeing, a feat that often took multiple staff members to achieve safely. We had to be careful in times of rain, especially rain as the water would rise a start to lap over it. With caution some vehicles could get over this like going through a puddle, but after one very heavy rain driving over the bridge became impossible for ANY vehicle, not matter how high they sat. The high water flooded over the driving bridge and onto the bank, too fast and deep to risk any vehicle, and leaving access to the two sides of camp to a higher sitting walking bridge. (Where all these pictures were taken from.) Extra caution was taken and food delivery trucks had to be unloaded on one side of camp and carried across the foot bridge and across most of the camp to get to the kitchen/dining hall. The real adventure was seemed to be on the smaller cars "trapped" on the other side of the bridge, unable to leave without using the back road, a rough one through trees and up a steep hill. With caution, it could be done, but there was a very real fear of bottoming out or getting stuck.
Camp life was rarely boring and one never knew what might lead to the next adventure, even heavy rain and a low lying bridge.
Thursday, May 26, 2011
Opps!

 I'm always on the lookout for new projects, new materials, new ideas, and new ways of trying things. While looking through somethings at home I realized that the blue plastic ups we had used for some things were made from number six plastic and decided to try these for a necklace or bracelet made using shrinkie charms. I figured the colored plastic would make an interesting look to the final project and started the drawing and cutting process. I even cut a strip fro the cup that I thought might be shrunk down and bended into a ring or attach a yarn to make a bracelet. I was optimistic. I was wrong.
 I followed the instructions of something I had done a couple hundred times, at the very least. My optimism was mislaid this time. The plastic curled in weird ways and wouldn't lay out flat when when I tried. The long strip I but shrunk in one direction but not the other. Most of them ended in such a weird twist not just twisting, but also changing circles into long misshapen not quite oval things. I'm not sure what happened. It might have been the process that goes into shaping the plastic into cups or the coloring process but it just did not work right.
From a pile of hopeful charms, I ended up with only one that is even usable and the rest just a pile of twisted melted plastic.

 Sometimes things do not work out. Sometimes the greatest ideas end up in a pile of twisted plastic. Sometimes we spend time and effort on something that just does not work out. It doesn't mean I've given up or ever will. Sometimes the mistakes come out even better than what we thought they would as we find something new. Most times it helps us grow and learn. Art and crafting is all about learning, growing, and taking on new challenges. We learn, we grow, and sometimes it works out better than others. Through the errors we learn new things and get ready to take on new challenges. I mean, what's the worse thing that can happen, a pile of twisted, melted plastic? I've seen worse after a dinner with the family.
Wednesday, May 25, 2011
Damnit Doll - How To

A Damnit Doll it something you can beat up, smack, throw, and yell at without taking it out on the person or drier next to you. I made a road rage damnit doll for my mom, who spends a lot of time driving and dealing with "idiot drivers." I figured it would give her a safe outlet.
I used denim scraps from an an old pair of jeans that got used for another project, magic markers, my sewing machine, and some poly-fill stuffing.

1) I cut a basic doll shape. Fairly generic, you could make it more personal if you want.
2) I decorated the denim, doll front and back, with magic markers.(You could use fabric markers, but with the dark fabric I stuck with Sharpies. You could also embroider but I knew this doll was being made to beat up.) I drew a basic face and instructions for use.
3) I sewed both sides together using my sewing machine in a heavy duty stitch leaving a space open for the stuffing. (Remember this doll is made to beat up, so double up the stitches if you feel the need.) Depending on the doll and the overall appearance, you can sew front sides together and then turn out or sew wrong sides together and use the stitching on the outside as part of the finished look.
4) Stuff. Finish sewing up the opening with sturdy stitches.
5) Let the rage out... on the doll, not your neighbor.
Tuesday, May 24, 2011
A Clown or a Scarecrow?
In honor of "The Ladies Who Craft" I share my clown scarecrow. He didn't start out as a clown, but he ended up as one. Sometimes things just evolve.

Monday, May 23, 2011
Camp Tales - The Freezer
The first summer I was at camp, I started the summer off with cleaning, organizing, sorting and taking a general account of supplies. (This would become typical for the beginning of these summers at camp.) I had become begrudgedly accustomed to finding the the occasional dead furry thing amongst the boxes of yarn, fabric, popsicle sticks, old magazines, markers, beads, thread, & so on. (I had an agreement with the Head Naturalist/Environmental Ed Director that as long as I didn't freak out over the dead things or the live ones I came across, he would make one of the naturalists remove the dead animal from my space.) It was common to come across where animals had sought refuge bedding and food especially during the old months when the raft Hall was closed up. I had entire cardboard box of twine that had been so destroyed from wintering mice, that I ended up heaving into the dumpster.
As I cleaned that first summer, I found any things from summer's past as I sorted through through boxes crates, spider webs, and dirt. As I moved boxes I was prepared for things that moved, slithered, and crawled. Beneath a pile of boxes I found an old freezer. It was a smallish chest freezer, still decorated with ice cream stickers from when it had lived once in the camp store. It was not uncommon to use old freezers for storage against ravaging critters and I wondered if it still worked or if it was full of more craft supplies. I opened the lid slowly, not sure what I would find, but not prepared for what I did find. Eyes stared up at me, but not the living kind. I slammed the lid tightly, before slowly opening it again. It was a working freezer full of carefully wrapped dead birds and tiny mice and baby bunnies mostly in clear plastic. For a moment it felt like something from a horror film and I was suddenly recalling how any such films took place at a summer camp deep in the woods. I didn't scream. I didn't yell I didn't run. I quietly closed the lid and left it be until I could figure out what the heck was going on with a freezer of dead animal in my Craft Hall.
I found out later about the freezer and like with any things there was a reasonable explanation. Our camp had a full Nature enter full of stuffed animals that had died of natural causes. Some of the birds and creatures were ones that they were waiting to be taken to the taxidermy when funds were made available. We were also a Bird of Prey Rescue and the frozen mice and baby bunnies were ones that were used to be to be cut up and fed to injured birds in need of food. (It made me very glad not to be one of the Naturalists that this task often fell to.) It all made sense when explained, but looking back the explanation would have been nice to come BEFORE I opened a freezer of dead animals looking up at me.
Sunday, May 22, 2011
Sharing the Orang-ie Goodness

 |
| Orange peels simmering in syrup. |
 I candied the peels of two oranges, about a cup worth of clean peels, drained them, then let them dry before rolling them in raw sugar and dipping part of them in melted semi sweet chocolate. They are a lovely treat. (The preperation process takes out the bitterness.)
The process leaves an lovely orange infused simple syrup, that is perfect for tea or other beverage use. I bottled this syrup in a clean glass bottle I had emptied for something else (You never know when things like this might come in handy.)
 The dried and chocolate set candied orange peels were packaged in a plastic bag I labeled both the simple syrup and the orange peels, then packed them in a small lunch bag with colored tissue paper and a card.
Candy making usually involved simple ingredients, with precise use of technique and ingredients. I love it!
Saturday, May 21, 2011
Gifts Recieved - Gifts Treasured

 The first is a hand made cross, I think it was crocheted. To be honest, crochet, knitting, and the like are things I know little about. (I'm just learning to knit on my own.) Someone made these cross bookmarks for me and my siblings but I can't remember who. An older family friend perhaps. (I feel bad for this, but I can't help it.) Some of them were of only one color, but I favored the one with the rainbow of colors. For years it hung on the bulletin board in my bedroom.
The little girl figurine was a gift from a my grandmother years ago for Christmas, crafted by a friend of hers from church. The tiny book in the doll's in hand is "Christy." It is a movie and mini series that we shared. It doesn't sit more than 2 inches high.
 The small chest was a gift fro a friend in high school. She found a small chest and stained it in a cedar to match the cedar chest I had made years before. I use it now to hold coins I've collected from different around the world as well as my small collection of pressed pennies. It sits on a shelf in my room amongst old family photos.
Embrace the gifts that mean the most because they were chosen just for you, made with someone's own hand.
Friday, May 20, 2011
"Chinese Take Out Swan" Favor


For these opening night gifts, I used magic markers to add names and notes to the outside of the mini boxes and filled them with no bakes made from the crunchy noodles found in the Oriental foods aisle.
 I started with a regular piece of aluminum foil. I wanted them about the size of a favor to fit in the palm of the hand, so I cut the piece of foil in half, making a rectangle. It needs to be rectangular for the swan to work. (The supplies are simple for this... aluminum foil like you find in your kitchen and something to put inside it. You don't need tape or glue to secure it, the foil will do it all by it's self.)
 I placed the candy on the center of the foil, towards one side like in the picture. One end of the rectangle will be the tail (it's the short side) and the other will be the swan's head and neck (it needs to be the longer side). In this case, I used homemade candied orange peels mixed with semi-sweet chocolate chops for the inside. You want enough to give it body, but not too much or you won't be able to close it securely. (They are often dipped in chocolate, but I liked the appearance of the orange peels and chips for this case.)
I started with securing the foil by wrapping it around the candy pieces and folding into itself to keep the candy secure inside. Once again, make sure one end of the foil if longer than the other, one side for the neck & head, the other for the tail.
 Roll the neck/head side to to create the elongated neck and shape into a slight hook with the neck leading to the head. Be careful not to tear the foil. (There is no need for any tape or anything else to secure. The crinkling of the foil will be enough.)
Pinch the other end (the tail end) slightly to secure the bottom end from the candy escaping. Fan out the bit of foil to create a fanned tail shape.
 Just a few twists and pinches of the aluminum foil and you have a swan ready for any table setting or dressing room table. My mini swans and mini Chinese Take out boxes were a hit with my cast and crew. (The homemade candy inside was a huge hit as well.)
Anything and everything can be used as inspiration. For this I used something that might seem common place to many people, but when personalized, miniturized and filled with homemade candy it was proof that you can find humor AND inspiration anywhere to fit any theme.


Thursday, May 19, 2011
Beaded Jewelry Collection
 What can you get from an inexpensive bead ring kit that severely lacks directions? With a little creativity, imagination, and a desire to try some new things... a whole collection of beaded jewelry. One kit for $1 (at local Dollar Store) + a few things I already had on hand (equaling only an added few pennies here and there) = a new collection of beaded jewelry. (9 Pieces to be more exact.)
Three beaded rings. (A Flower, a peace sign, & a cloud burst.)

+

+
Two Beaded Slave Bracelets. (Water and Fire inspired.)


+
Bottled Amulet on Beaded Necklace
+
Beaded Rainbow Bracelet
+
Beaded Twist Ring
+
And with the wire all used up there are still beads to spare.
=
So, to recap - nine pieces of jewelry (with beads leftover) from one box of wire and seeds beads.Keep your eyes open, you never know what you might find. (Guess what kids, I still have another box that I haven't opened yet.)
Wednesday, May 18, 2011
Cross Stitched Feminism Pillow

For this project, I used the female symbol, cross stitched in black and red to embrace the ideals of feminism and equality.
 |
| I started with a template made on graph pattern for the pattern. The lettering and phrases around the edges were mostly just to get a template for the letters not for the final placement. |
 |
| Using black and red embroidery thread, I cross stitched my female design with phrases around the edges that emulated the theme. "Never let the hand you hold, hold you down." "History and Herstory." "If your not outraged your not paying attention." "A woman's life is a human life." "I am not your Barbie Doll." "The meek are ready." "Proud to be a feminist." "equality.""I resist." And so on. I then embellished the sides. |
 |
| When the needlework was completed I cut a square of a red velvet-like material (seen in a few other projects) for the backing. Instead of sewing them right sides together, I opted to sew them wrong sides together. |
 |
| Wrong sides together, I pinned the edges securely, especially taking into account the stretchy nature of the red backing fabric. Then, using a strong backs titch hand-sewed the two sides together with black embroidery thread, using the stitches along a clear straight line as part of the overall design, but making sure to leave a small gap to stuff. |
 |
| Using the opening I left, I carefully stuffed the pillow to the desire fluffiness with some poly-fil I had on hand, being careful not to rip open the stitches around the opening. |
 | |
| Once full, I pinned the opening (once again being mindful of the stretchy nature of the red fabric for the backing), and sewing it securely shut with black embroidery thread and the back stitch. I pulled the loose thread from the fabrics to give a fringed edge to the small square pillow. |
 |
| A pillow to make any feminist proud. (Take ye inspiration where ye may.) |
Subscribe to:
Posts (Atom)